Adding a touch screen to the Candle controller
The Candle controllers you can see on this website have really nice touch screens. However, getting your Raspberry Pi to show the Candle interface actually takes a few steps, which we'll explain here.
1. Connect your display
The following steps will require your Cande Controller to (temporarily) have access to the internet to download the required software. Please make sure you have already setup your Gateway using the normal steps.
Let's connect your touch screen to the Raspberry Pi first.
- Plug the HDMI cable into the display and into your Pi.
- Plug the USB cable into your display and into your Pi. It will carry the touch signals back to your Pi.
2. Install the Seashell addon
Go to Settings -> Addons and click on the (+) button. Scroll down until you see the Seashelll addon, and then click on the 'add' button.
From the main menu you can now select the new Seashell option. If you don't see it, refresh the webpage first.
3. Type in the command
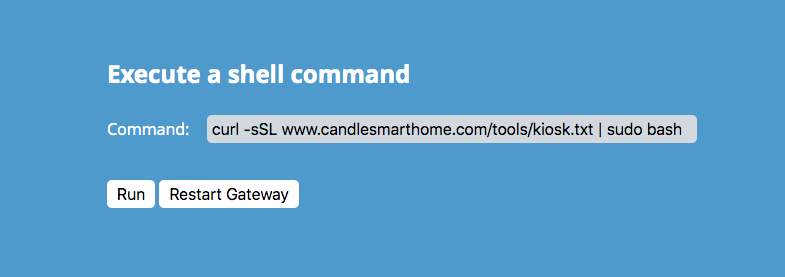
Type in the command exactly as you see in the image above.
Click on the "run" button.
After a few seconds you'll get an error: "TypeError: Network Error when attempting to fetch resource". That's because Seashell wasn't made to handle commands that take 30 minutes to complete, so it's complaining that the command is taking more than 20 seconds.
4. Done!
This downloads and runs a script that automates the entire process of installing software and changing settings on your Raspberry Pi. It should take a minute or two to install (but it could be longer if your internet connection is slow). Just let it run.
When it's done it reboots automatically. You should now see the interface on your display.
If you do not, have a look at the troubleshooting section below.
Features
- An on-screen keyboard will automatically pop-up if you select a text input field.
- Drag your finger down from the top of the screen to refresh the page.
- Drag from the left or right side of the screen to navigate backwards and forwards.
Extra features
If you take out the SD card and plug it into your computer, you'll be able to see a few files on it, which you can modify.
- You can replace splash.png with your own startup image.
- You can replace splash.mp4 with your own startup video.
- You can change the URL that is loaded into the browser by simpy replacing the one inside the candle_kiosk.txt file.
- If you turn candle_kiosk.txt into an empty file, then the video will loop indefinitely. It's an easy way to turn you Raspberry Pi into a looping video player. This can be used in exhibits, for example.
- If you start the device with a mouse attached, then a mouse pointer will become visible.
Troubleshooting
Some touch screens require extra drivers to be installed. You can find instructions on how to do this on the website of the producer of your display. Generally this involves temporarily placing the SD card in your computer and modifying the config.txt file that's on it.
Here are some common lines of text you may have to add to the config.txt file:
For my full HD touch screen I had to add:
For the common 7 inch touch screen (with 1024 by 600 pixels resolution) you may have to add:
Can I undo it?
Yes. If you ever want to go back to the original login option, take the SD card (or USB stick) out of the Raspberry Pi, open it on your computer, and remove the candle_kiosk.txt file that you will find on it. This doesn't remove the software, but once that file is removed the new software will no longer load.
Share this article
These are privacy friendly sharing buttons; no code from these companies has been loaded into this page